Showing posts with label DIY. Show all posts

Monday, April 16, 2012

Bathroom Redo Part 7 (The Almost Finished Product)

 So you remember this mess, right?  Well, it looks like that no more!!  It took several weeks of patching, sanding, patching, sanding, priming, painting, gluing, hanging, plumbing, and scrubbing, but it's done!  Mostly.

I was young and excited to paint my first home when I painted this room Dare Devil Red by Behr.  See, I was so excited about this color that I remember what it was even though I painted it over 7 years ago!  It wasn't until a little over 2 years ago that I installed the tile floor painted the vanity black.  Other than that I made no changes.  Changes really needed to happen in here!  I hated the light fixture. I hated the medicine cabinet in the wall. I hated the mirror. I hated the faucet. And I was so tired of the color.


Now check out this beauty!!  The color is Carolina Inn Lobby Yellow by Valspar.  I originally wanted something a little more mustardy, and had picked out Carolina Inn Crossroads Gold, but hubby thought it'd be too dark.  And we'd had about enough of dark with the red!  I like it, though.  It looks different throughout the day depending on how much light is coming in through the skylight.

So here's the rundown.  New light fixture!!  No more 1980's runway lights!  It's from Lowe's.  I liked the clean lines and I really liked the price.  So much so that I bought two!  If you look closely at this picture you'll see the same fixture hanging over the vanity.  Don't look too closely because all the tools that were moved out of the bathroom were put on the vanity.  :)

I gave the builder's grade mirror a facelift.  The sink got an update with a new faucet.  I added a rail from IKEA to hold toothpaste, qtips, cotton balls and the like in cute little buckets.  (I thought this was going to be so convienient for me!  Little did I know that the toddler would think to climb up on the toilet to grab qtips and throw them all over bathroom!)  I still want to find a wall cabinet to hang above that rail to store a few of the things that had been living in the old, ugly medicine cabinet.  I'm on the hunt for the perfect one!

The shower curtain was a find at Marshall's.  It was actually the first time I went to Marshall's when I found this shower curtain.  It was what kicked off the "I want to paint the bedroom and bathroom" excitement.  I need a new shower curtain rod.  Or the old one needs touched up.  The curtain hooks have been hiding under the sink in the hall bath for several years.  Hubby didn't like them (he uses the hall bath since the master is so small) because they didn't move smoothly on his curtain rod.  When we replaced them I just put these ones in a bag and hid them under the sink.  Good thing, too!

I added some towel hooks, changed the toilet paper holder, and added a new switch plate.  The hooks and t.p. holder are from IKEA.  I think I'd like to find a piece of art to hang next to the towel hooks.

And one last view.  The new hand towel holder living where the old medicine cabinet was.  And I changed out the old beige outlet with a fresh new white one.
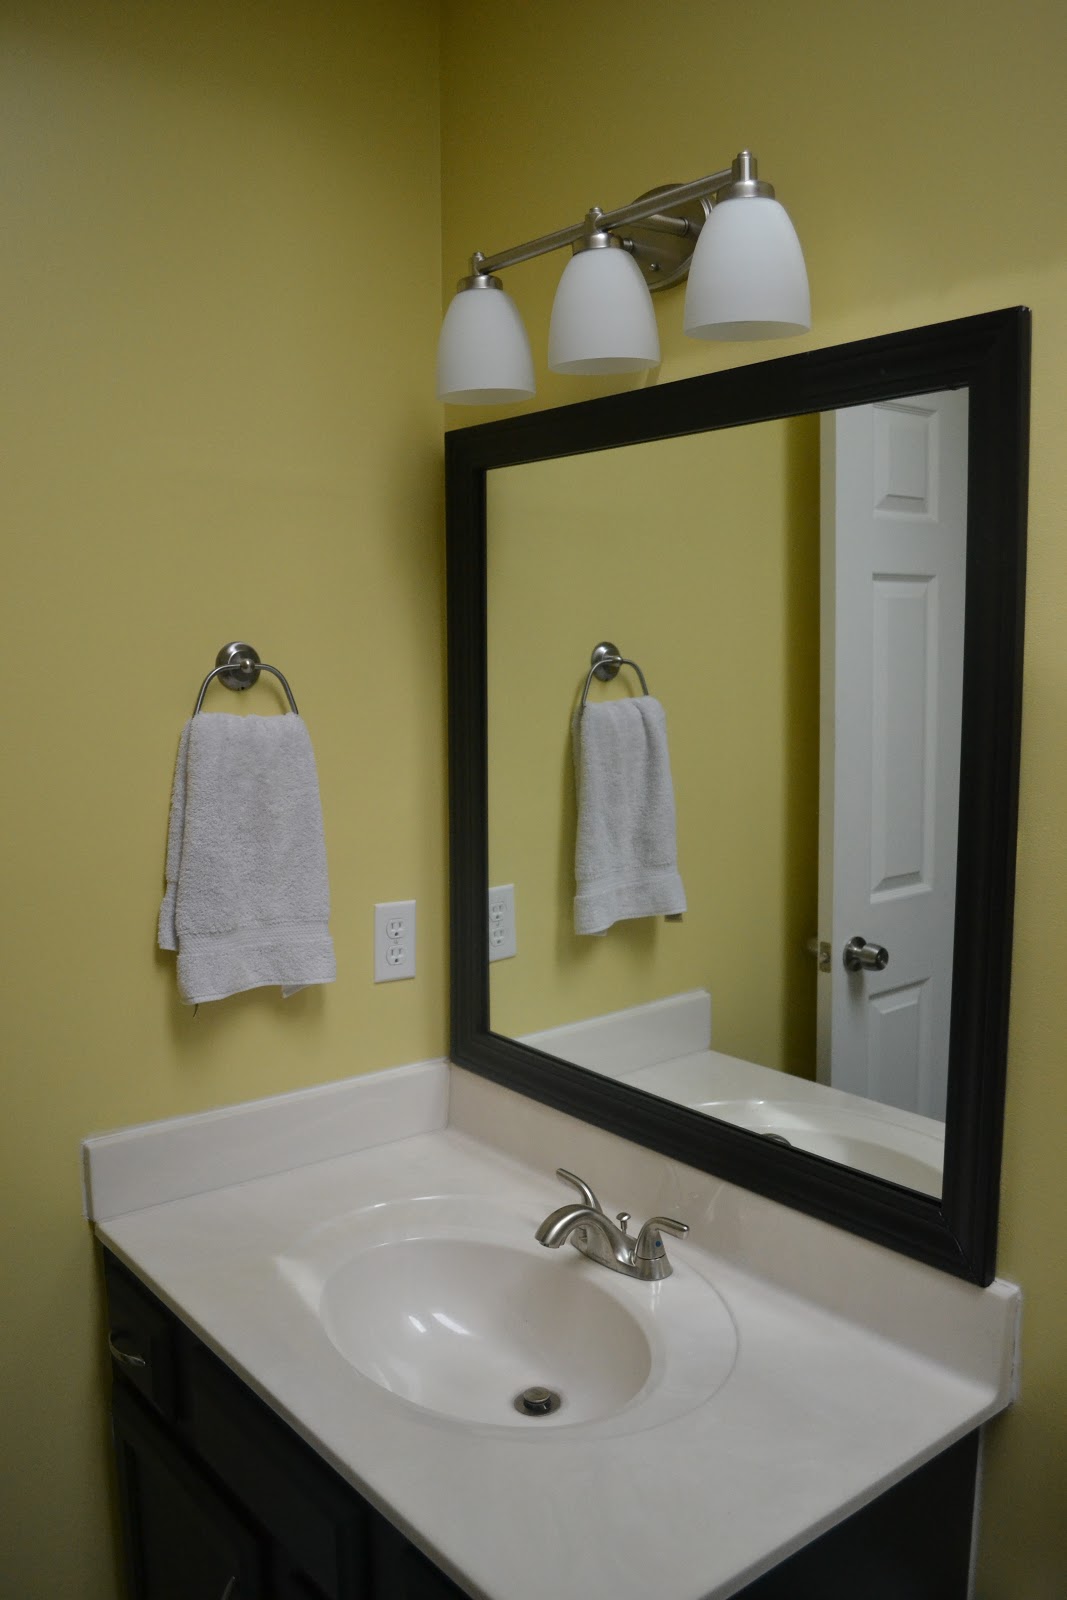
I'm happy!  I would love to retile the shower, but that's a big project that this pregnant momma just can't undertake!  One day...........


Pin It

Friday, April 13, 2012

Bathroom Redo Part 6 (I am not a plumber)


I hate plumbing.  But I hate this faucet even more.  It's very outdated.  And it's hard to turn on without it coming on with the strength of Niagra Falls.  Time for a new faucet!!

I found this beauty at Lowe's.  It's much prettier than the old one!  And it's brushed nickel so it matches the drawer pulls and new wall fixtures.  And it has a new drain stop that will hopefully work better than the old one.

 So, removing that old sucker was not fun.  This was the view that I spent a lot of time looking at.  Those bolts were on tight and there wasn't a lot of room to work with.  I kept running into pipes, and drawers, and the sink bowl while trying to get those suckers off!  And did I mention I had to lay on my back inside the sink and reach up there with my short arms?  Short arms that had gotten a pretty good workout at Stroller Strength that morning?  Have I mentioned that I hate plumbing?


 One of these things is not like the other............  And this is the part where I realized that I would need some tubing to attach the water lines.  The old stuff wasn't going to cut it.  This was also the part where I realized that my arms were not long enough or strong enough to remove the old drain myself.  Boo for delays!  I hate to wait for the hubs to get home so I could make a hardware store run and so he could hold one wrench while I held the other.  And someone would have to do the turning.

A trip to the hardware store, some water supply connectors purchased and the help of the hubs to remove the old drain and back to work I went.  Back under the sink!  I probably got under the sink about 20 times during the process, which means I had to get back out from under the sink about 20 times.  It's a good thing I don't have a big baby belly to make it more difficult.  I do however lack the stomach muscles that would've been very helpful in that situation.  This is the last plumbing job I'm doing during pregnancy!!

But look at this beauty!  So much prettier than the old faucet.  And it works better.  And the drain hasn't fallen off, yet.  I am in teeth brushing, hand washing, and face rinsing heaven with this thing!

Pin It

Thursday, April 12, 2012

Bathroom Redo Part 5 (Finishing the frame)

It's time for the tape to come down!  Hurray!  No pieces fell off!  Looks pretty good, right?  Much better than that plain old mirror!  It's still not done, though.  While it looks great from afar it needs a little touch up work.  It's time to clean up the seams. 

 See, when you look closely it's just not that pretty!

Get our your caulk.  It doesn't matter what color it is, just make sure it's paintable!  Spread some down the seams.

 And using that handy tool that is already attached to your hand, squish it in there and wipe away the excess.

Yeah, it's that simple.  And then wait some more.  Once it's dried we'll clean it up with a little bit of sandpaper and touch it up with some paint.


Pin It

Wednesday, April 11, 2012

Bathroom Redo Part 4 (Hanging the Frame)


 The paint is dry! It's time to make this mirror beautiful!!  So here is where the Liquid Nails comes in handy!  Since I couldn't use it on the back of the mirror I figured I'd use it on the front.  No way was I going to attempt to use the Sikabond on that.  Besides it not having a nozzle it was hard to control.  So, I started with the bottom piece.  You want to put a good amount of adhesive on your trim piece, but don't get too close to the corners or the edges (particularly the inner edge).


Slap that baby up on the mirror!  OK, don't just slap it up there.  Line it up and press it on firmly.  If your piece isn't resting on the lip of the backsplash now would be a good time to get out your level and make sure that piece is on straight.  Tape it in place and repeat.  When hanging the side pieces you want to make sure you line it up with the edge of your mirror and again, get out the level and make sure it is straight.

I then hung the other side piece and then the top, taping after each piece went up.  You'll notice on the bottom right I used the tension rod again.  Once I got the piece on I realized it wasn't completely flat. So I used the rod to push it into place.  Worked like a charm (but next time I'll make sure my piece is flat first!!)

This stuff says it takes 72 hours to cure, so again we wait!


Pin It

Monday, April 9, 2012

Bathroom Redo Part 3 (Framing the mirror)

This is the part of the bathroom redo I've been the MOST excited about.  It's time to frame the mirror!!!  I didn't want a large frame.  I knew the bathroom couldn't handle it.  I settled on this small trim (which I later realized matches the door frames throughout the house!) which came in a shorter length than a lot of the other trims offered at Lowe's.  That worked well for me since I had a toddler in my cart and it was hard enough maneuvering around the store with these lengths.  I wouldn't have wanted to attempt it with longer cuts.  So out in the garage I gathered my supplies.  Trim, miter box and saw, measuring tape, pencil, notepad with measurements and baby monitor.  Yep, that last one is definitely a necessity when you're working during a nap time.

Measure twice cut once.  I mitered one edge of the trim and them measured and marked where my next cut should go.  Can you see that little red line on the left upper notch?  That's my cut line.  I secured my wood in place, grabbed a hold of my saw and my box and got working!

Don't forget to visualize what direction the cut needs to go before you start sawing!  This is the bottom piece of the mirror that I am cutting and the piece on the right is what I am using.  The thicker part of my trim is at the bottom.

Repeat this step several more times.  I had 4 pieces to cut and two mitered ends to cut on each piece.  8 cuts with a hand saw is hard work.  My poor little hand was stiff afterward!!  I really wanted to get this project done before nap time was over and while hubby was at work since I was in his parking space in the garage, so I pushed on.  All 4 pieces were cut!

I laid them out on the floor to admire my work!  And I took a picture to commemorate it!

And then I took a picture to show how awesome I am at determining how much materials were needed.  This is all the scraps I had left.  I'm pretty impressed with myself.  (I really lucked out that the precut sizes were long enough to cut two pieces from, but short enough that I wouldn't have much left over)

We're ready to paint!  Dig out that box of thumb tacks that you're not sure why you've been keeping and put them to work.  It's much easier to paint the sides of your trim pieces when they are elevated and not touching the work surface.  Space a few thumb tacks out along the back of your trim, flip your piece over and there will be plenty of space between your edges and your work surface.  (and then brag to the hubby that you knew the tacks would come in handy one day)

I painted the trim black.  I used the same black paint that I used to paint my vanity (seen here).  It is Glidden Onyx Black.  I only have a quart of it, but it was a free quart!  Twice now Glidden has given away free quarts of paint and this is the first one I received.  It has come in handy!  (I also used it to paint my desk.)

Remember how I was so concerned with getting my work done before hubby came home?  Yeah, the paint wasn't dry, yet, when he got home, so he still had to park in the driveway.  And then the next day I did this.  I flipped them over and painted the top inside of each piece.  This is a MUST.  The reflection of the backside will show once you hang your pieces.  That is why you want to paint them.  So let these dry again and you'll be ready to hang them!!!


Pin It

Friday, April 6, 2012

Bathroom Redo Part 2 (Rehanging the mirror)

 You've all seen the great builder's grade mirror transformations all over the internet, right?  I've wanted to do that for YEARS in all my bathrooms.  We have those ugly just attached by a little plastic clip, no frame mirrors in all 3 bathrooms.  I HATE them.  I saw a mirror transformation with trim on HGTV a long time ago and insisted that one day I would do that.  I just needed to figure out how.  I had those pesky clips to worry about!

When I installed the new light fixture in the bathroom it hung down so that it overlapped the mirror.  I didn't like that.  I also didn't like that I couldn't fit any trim around the mirror to frame it.  So the decision was made to put the mirror down as far as it could go, on the lip of the backsplash.

Off to Home Depot I went to find some mirror adhesive.  The only adhesive they had was Liquid Nails.  I read the back of the can which informed me that the adhesive was meant to be used in conjuction with fasteners such as the clips or a channel.  Yep, not what I was looking for.

Off to Lowe's!  They had the same Liquid Nails and the two nice employees who tried to help were stumped.  One gal handed me something and said it would work.  It specifically said it was not to be used on mirrors.  No dice.  Then in a small box up on the highest shelf I saw 3 cans of Sikabond.  I grabbed one and started reading.  It looked like a winner!  (and previous Google searches suggested this was the best adhesive to use for the purpose I was looking for)  As you can see in the picture above there is no nozzle on this bottle.  Yeah, none of the 3 bottles had one.  Luckily I didn't really need one since I wasn't trying to be precise and make pretty caulk lines and the nice gal that handed me the wrong product earlier felt bad about the lack of nozzle so she marked it down to $5 instead of the $10 it was listed at.  Score!

Hanging the mirror was a two man job.  So I had to wait until the hubs had a free moment to help.  He's a busy man......I got impatient.  Finally he had time to help!!!  I loaded my Sikabond up in the caulk gun and man that stuff is thick!!!  We have a medium duty caulk gun and it had trouble with that stuff!!  Hubby started off holding the mirror while I applied the adhesive, but my hand got tired REAL quick and we had to trade jobs.  Here you can see the lovely caulk job we did!  Luckily no one (but you) will ever see that!!!

We pressed that sucker up against the wall (check out that new paint color!) and pressed and pressed and pressed!  We grabbed a tension shower curtain rod to help brace the mirror and added some tape along the top for extra hold.  The cure time listed on the package said 5 to 8 days.  I kept it up for 7 just to be sure.  I didn't want that thing to come crashing down!! It was a long 7 days.  I have been SO SO SO antsy to get back in that bathroom!

At this point I had already patched the walls, painted, installed a new light fixture, towel holder, toilet paper holder, scraped all the old caulk out of the shower, recaulked, and scrubbed it shiny! I just wanted out of the hall bathroom!  But I wasn't willing to steam up that room while the adhesive was setting, so I had to wait some more..........


Pin It

Wednesday, April 4, 2012

Bathroom Redo Part 1 (Before-ish)

 It started like this.  Actually it started a little worse than this!  As you can see I didn't snap these photos until I had already started my bathroom redo.  And this is after a bit of an upgrade that I did when I was pregnant with Cupcake.  I tiled the floor and painted the vanity then.  The previous floor was sheet laminate.  I tore that out and laid this gorgeous tile!  And the vanity was oak with brass handles.  So I painted it black and added some sleek brushed nickel ones.  And then I continued to live with it in all it's red with the ugliest brass you're a supermodel light fixture glory.  I had a newborn to take care of! And then an infant! And then a toddler!  Except now that toddler takes one long nap a day and goes to bed early which allows for a little toddler free redo time.

So I started out by ripping out the shelf that had been installed just above the toilet tank, the ceramic towel bar above that, the ceramic toilet paper holder that resided across the way from the toilet and the recessed medicine cabinet next to the sink.  What I was left with was a lot of holes.  Oh and did I mention taking out the light fixture and finding another big hole that would not be covered by my new light fixture?  (BTW, I replaced the same ugly light fixture above the vanity that is in my bedroom and the hole under that one was even WORSE!)

So my father-in-law recommended joint compound over spackle for all the patch work.  He said it wasn't as thick, therefore making it a little easier to smooth out.  Plus I had to do a drywall patch where the medicine cabinet was so joint compound would be required to cover the tape.  So I bought a big ol' bucket of it!  Luckily I already that the drywall on hand (the previous owners had some left over from when they finished the basement) and the drywall tape and drywall screws (I used it when I laid new cement board under the tile floor).  I ended up buying 2 drywall patches for the light fixture mess.

And how do you like that broken corner, builder's grade mirror?  LOL  I broke the corner of that mirror when we first bought this house (7 years ago - yay! my bad luck is over!), but never found a mirror I liked to replace it.  Don't worry.....it's not coming back!

So there you have the "before-ish" shots.  Coming up next are some "during" shots and maybe (if I ever finally finish it) you'll get the "after" shots.  So stay tuned!


Pin It

Monday, April 2, 2012

DIY Dilemma!

 I wanted to touch up some paint yesterday or maybe paint the trim in the guest room walk-in closet when I came to the horrible realization......"I only have one paint brush and it is covered in paint!"  I have about 10 paint rollers, yet only one brush? How the heck did that happen?  I scoured the basement looking for one and all I could find were my foam craft brushes and a 4" wide brush.  Not cool!

Luckily going to the hardware store was on my agenda today.  I needed to return a switch plate and outlet plate as well as pick up some play sand and flowers for my big pot on the porch.  I also added two paintbrushes to that list!  And now I want to share with you my favorite paint brush!  I know there are all sorts of fancy paintbrushes out there and some really expensive ones with magic bristles, but this is my FAVORITE brush.  It's all I ever buy.  The reason?  The handle!!!

I love the short handle.  It makes it very easy to hold.  It's especially handy when you have to get into a tight spot.  But the best part of all is that it is flexible!!!  You see that?  Do you see me bending the handle?  I really feel like I can better control my paint application with this brush because I can move my hand to a comfortable position by bending the handle.  I also love that it's an angled brush.  It doesn't matter what I am painting.  I always prefer an angled brush.

If you aren't bored and are still reading this and maybe you're even interested in trying this brush out for yourself I typically find it at Lowe's.  I might have picked it up at Home Depot before, too, but I can't recall of the top of my head.  It's well worth the $6.  And bonus points because it is make in Ohio!!

Pin Itp.s.  Don't you just love the feel of brand new paintbrush bristles?  No?  I am the only weird one?

Monday, January 30, 2012

New Light


 So, this is a before and after post, but I don't have a before picture.  When I first started this blog I thought it would be all about what Little H and I do all day.  Turns out we can be quite boring sometimes.  How often do you want to hear about playdates or story time or going to the park?  Yeah, that's what I thought.  So, I thought I'd start including more about our entire life, which includes my home improvement projects and craft projects.  Hubby just does school work which isn't the least bit exciting, so we'll just ignore him!

Anywho, now that I intend on posting my projects I will be better about my photographs.  But I'm sure you can picture this one for yourself.  I picked up a brass lamp from Goodwill for $1.99 probably a month or so ago.  It sat in the living room for a while.  I was busy working on the desk project.  But the day I spray painted the drawer pulls I was in a crazy spray painting mood and pulled the lamp outside, too.  It got a coat of primer and a few coats of Valspar Golden Maize spray paint in Satin.  Perfection!  (to spray the lamp base protect the bulb unit and the cord by wrapping with a plastic bag and taping it in place).  I then found this gorgeous lamp shade at IKEA.  Doesn't it make you happy?

A little more work needs done on it.  I need to cut a piece of felt to glue to the bottom to protect the surface I rest it on.  And then it needs to find a home (other than on the dining room table).  I'm thinking it'll end up in Cupcake's big girl room one day.

I'm very happy with the finish I got from the Valspar spray paint and I really like the way the "cap" just twists into place, but I did find the nozzle quite difficult to press down.  I have another project that I hope to get to soon that I will be using a different can of paint and I'll let you know if it was a fluke.

Pin It

Sunday, January 22, 2012

Naptime Project

It all started with this.  I found this desk cheap on Craigslist. It's old. It's wood. It needed some love. I needed a new desk for my new office.  So Cupcake and I went on an adventure, hoped we wouldn't get kidnapped and picked it up.  It had a little bit of water damage on it (look at the bottom left), but I thought I could handle it.  So it came home with us.

It sat in the garage for a few weeks, causing me to have to park in the driveway (and scrape ice off my car when I left the house in the morning) and I worked on it while Cupcake napped.  I started out with some eco-friendly paint stripper that didn't smell.  It also didn't work well.  Or really at all.  I was scraping, scraping, scraping and the paint was just sticking, sticking, sticking.  I took the orbital sander to it, but that just made a huge mess (and who knows how old that paint is, lead maybe?).  It was off to the home improvement store for me to get some real paint stripper.  What a difference the stinky stuff made!  That paint was just falling off the desk!!!  I should have used it sooner.  It would've gotten my car back in the garage one, even two weeks sooner maybe! 

4 layers of paint later, the desk was stripped! There were a few spots where I had to smooth out where there was water damage.  And then it was time to remove the gold paint off the drawer pulls.  I decided to keep the existing pulls because they were kind of funky, they were silver underneath and I didn't want to fill and redrill holes in all the drawers.  These pulls require two holes that are close together. Definitely not a standard size.  I soaked those bad boys in the stripper, but they also seemed to have 4 layers of paint on them.  It was a mess!  I scrubbed and soaked and scrubbed and soaked and unfortunately when I got down to the metal I just couldn't get it shined up.  Blah!

So the desk was stripped, patched, sanded, and cleaned and brought inside to paint!  I couldn't handle freezing my butt off in the garage (December in Ohio, not the best time for a furniture stripping project) while working on it............and I didn't want to have to deal with a freezing cold car anymore (I'm spoiled).  Here is the finished product!


Excuse the mess!  I was excited to move in right away.  I painted it black in eggshell finish.  I think used a overhead projector to project the swirl image onto the desk.  I outlined it with pencil and then painted the design with black, satin paint. I also painted the top of the desk with the satin paint.

I didn't plan on having such shiny drawer pulls, but they needed paint. There was no way around it.  They got a coat of primer, followed by a coat of metallic spray paint (because that is what I had on hand).

I had originally intended this desk to be a sewing desk and a friend is supposed to give me a desk to use as my office desk, but I need the office desk more so this will do for now.  If I get another desk this one will be headed to the sewing room.

Now I just need to finish working on my chair........................


Pin It